
Building a wooden seesaw swing at home using pictures, materials, and steps is an easy, engaging, interactive, and fun DIY project. Making a seesaw swing at home with wood allows children to fully experience the fun of building while also improving access to toys at home.
Building a basic wooden seesaw swing or a wooden cedar kit for children or adults is economical and affordable. We’ll explain step-by-step how to make a sturdy and safe seesaw swing out of wood, differentiating between child and adult construction methods. Using the appropriate tools and materials, you’ll learn how to create a fun, family-friendly, and durable wooden seesaw swing. Both adults and children can enjoy it, making time for fun and playtime less boring!
Build Wooden Seesaw Swings of Contents
Why Build a Wooden Seesaw Swing at Home?
A wooden seesaw swing offers a classic, durable outdoor play structure. It promotes physical activity, balance, and cooperative play for children. According to a 2024 CivicScience survey, 62% of homeowners plan to take on home renovation or remodeling projects, including DIY playground equipment for cost savings and customization. Building your own teeter totter swing allows you to tailor the design to your space and preferences, ensuring safety and quality.
- Cost-effective: Save up to 40% compared to store-bought swing sets.
- Customizable: Adjust size, color, and features to match your vision.
- Eco-friendly: Use sustainable wood to reduce environmental impact.
Materials and Tools Needed for Your Seesaw Swing
Selecting high-quality materials ensures durability and safety for your swing set teeter totter. Refer to industry standards from the Consumer Product Safety Commission (CPSC) for playground equipment guidelines.When you also want to learn about more general resources, such as indoor seesaw guides and ideas or the best cedar kit selection, these are all helpful for you to understand seesaw swing DIY and models, because seesaw swings are part of playground equipment.
- Materials:
- Pressure-treated lumber (4×4 and 2×6 boards for frame and seat).
- Galvanized bolts and screws for secure assembly.
- Weather-resistant paint or sealant for protection.
- Heavy-duty rope or chain for swing components.
- Tools:
- Circular saw, drill, and sander.
- Measuring tape, level, and square.
- Wrench and screwdriver for fastening.
- Cost Estimate: Approximately $200-$400, based on recent pricing data for wooden swing sets.
How to Build Your Seesaw Swing
Follow these detailed steps to construct a safe and sturdy teeter totter swing, inspired by a standard seesaw swing design. Always prioritize safety by wearing protective gear and double-checking measurements. For a clearer and more prepared build, it’s best to understand all the relevant pivot components beforehand.
Step 1: Plan and Design Your Seesaw Swing
- Measure your backyard space to ensure a 6-foot clearance around the swing.
- Sketch a design based on the picture, noting dimensions (e.g., 8-foot beam, 3-foot seats).
- Confirm wood dimensions align with CPSC safety standards for load-bearing capacity.
Step 2: Prepare the Wood and Materials
- Cut two 8-foot 4×4 beams for the main structure and four 3-foot 2×6 boards for seats.
- Sand all surfaces to prevent splinters, especially on child-facing components.
- Apply weather-resistant sealant to protect against moisture and UV damage.
Step 3: Assemble the Seesaw Frame
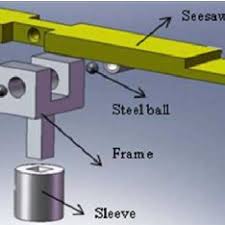
- Attach the pivot point using a galvanized steel rod through the center of the main beam.
- Secure seats to each end with bolts, ensuring even weight distribution.
- Test the balance to confirm smooth up-and-down motion. Include a diagram here.
Step 4: Add Swing Components
- Attach heavy-duty ropes or chains to the seat ends for the swing feature.
- Use carabiners for easy adjustments and removal, following ASTM F1148 standards.
- Ensure swing height allows safe ground clearance (minimum 12 inches).
Step 5: Install and Test the Seesaw Swing
- Anchor the base to the ground using stakes or concrete footings for stability.
- Conduct a safety test with adult supervision to check for wobbling or weak points.
- Adjust as needed to ensure smooth operation and child safety.
Adult vs. Children’s Wooden Seesaw Swing: Key Differences
While adult and children’s seesaw swings share a similar design, they differ in construction and purpose. Adult seesaw swings are built for heavier weights and may prioritize aesthetics or comfort, while children’s versions focus on safety and smaller proportions. A 2024 CivicScience survey found many homeowners opting for family-inclusive DIY projects, with features tailored for all ages. Understanding these differences ensures you build the right teeter totter swing.
What’s the Difference Between a Wooden Adult Seesaw Swing and a Children’s Seesaw Swing?
- Weight Capacity: Adult seesaws support 200-300 lbs per side, compared to 100-150 lbs for children’s, per CPSC guidelines.
- Size and Height: Adult versions may have longer beams (10-12 feet) and higher seats for legroom.
- Design Features: Adult swings often include cushioned seats or decorative finishes, unlike child-focused safety designs.
Tips to Simplify Your DIY Adult Seesaw Swing Build
- Use a single 4×6 beam instead of a complex frame to reduce material costs.
- Opt for rope swings over chains to simplify assembly and lower expenses.
- Skip decorative elements like paint or handles to streamline construction.
What Are the Best Anchor Points for a Wooden Seesaw Swing?
Proper anchoring ensures your seesaw swing remains stable during use. The CPSC recommends secure anchoring to prevent tipping, which accounts for many playground-related accidents.
Does a Wooden Swing Need to Be Anchored to the Ground?
- Yes, ground anchoring is essential for stability, especially for adult seesaw swings with higher weight loads.
- Use concrete footings or metal stakes to secure the base, ensuring a 6-foot safety perimeter.
- Unanchored swings risk tipping, per ASTM F1148 safety standards.
Where Else Can a Wooden Swing Be Anchored Besides the Ground?
- Tree or Pergola: Attach to a sturdy tree branch or pergola beam with load-bearing capacity (minimum 500 lbs).
- Deck or Patio: Bolt to a reinforced deck frame, ensuring structural integrity.
- Portable Base: Use a weighted base (e.g., sand-filled platform) for temporary setups.
Safety Tips for Your DIY Seesaw Swing
Safety is critical when building a see saw swing for children or adults. The CPSC reports that more than 200,000 children go to U.S. hospital emergency departments with playground injuries annually, with 45% being severe. Ensure your teeter totter swing meets safety standards.
- Use rounded edges on all wooden components to prevent injuries.
- Regularly inspect bolts, ropes, and wood for wear and tear.
- Ensure even weight distribution to avoid tipping, especially for adult seesaw swings.
- Supervise children during play to avoid collisions or falls.
- Reference: CPSC Playground Safety Guidelines.
Design Ideas and Customizing Your Seesaw Swing for Extra Fun
Personalize your swing set teeter totter to make it unique. Recent trends show parents adding inclusive features, with 71% agreeing playground equipment should allow all children to play together.
Kid-Friendly Designs
- Paint the seesaw in bright, child-friendly colors like red or blue for visual appeal.
- Add cushioned seats or handles for comfort and grip.
- Incorporate a dual-purpose design, like a detachable swing for versatility.
Adult-Friendly Features
- Use sleek, stained wood for a modern look.
- Add wider seats for comfort.
- Include decorative finishes or added comfort features.
Maintenance Tips to Extend Your Seesaw Swing’s Lifespan
Proper maintenance ensures your seesaw swing remains safe and functional. Regular upkeep can extend its life by 5-10 years, per industry estimates.
- Annual Checks: Inspect for loose bolts or cracked wood every spring.
- Weather Protection: Reapply sealant every 1-2 years to prevent rot.
- Cleaning: Wash with mild soap to remove dirt and prevent mold.
- Rope Inspection: Check ropes or chains monthly for fraying, as recommended by ASTM F1148.
Common Mistakes to Avoid When Building a Seesaw Swing
Avoid these pitfalls to ensure a successful DIY teeter totter swing project, based on feedback from woodworking forums.
- Using low-quality wood: Opt for pressure-treated lumber to resist weathering.
- Skipping safety checks: Always test weight limits (up to 200 lbs per side).
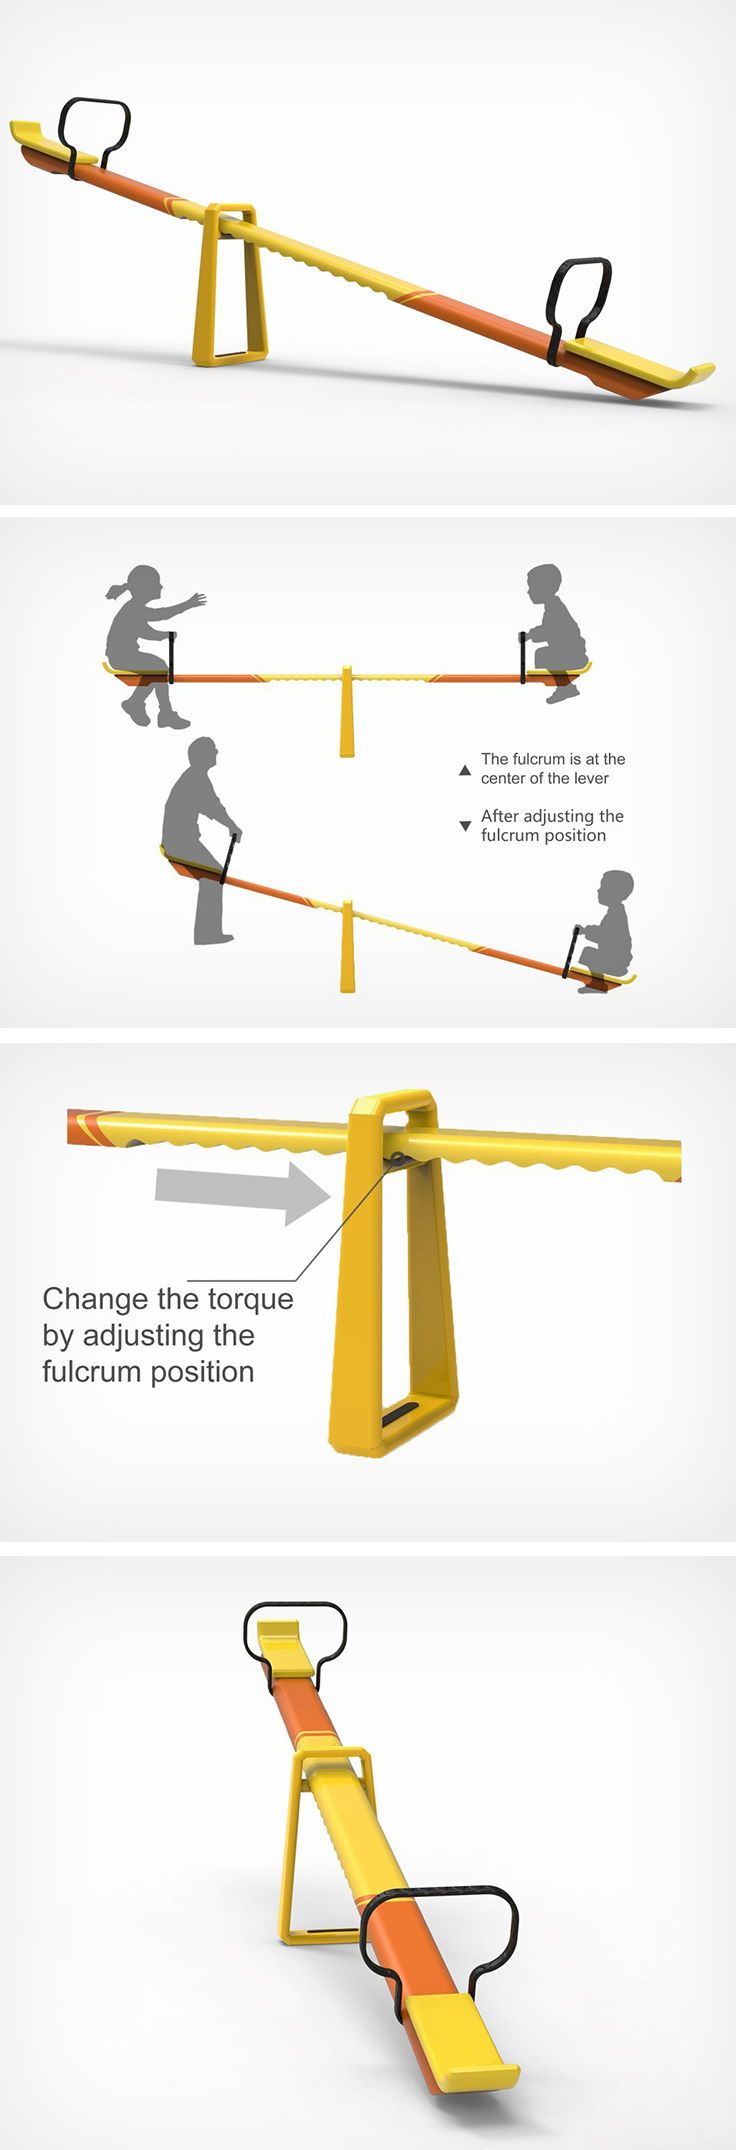
- Incorrect pivot placement: Ensure the pivot is centered for balanced motion.
FAQs About Building a Wooden Seesaw Swing
Address common questions to help readers build a safe, fun backyard seesaw.
- How long does it take to build a seesaw swing? About 6-8 hours with basic tools.
- What’s the best wood for a teeter totter swing? Pressure-treated pine, per Fine Woodworking.
- Can I build a seesaw swing without power tools? Yes, but a saw and drill speed up the process.
Final Thoughts: Enjoy Your Custom Wooden Seesaw Swing
Building a seesaw swing at home not only expands your and your child’s play toy options in a limited space, but also creates happy memories for both you and your child, fosters bonding, and improves hands-on motor skills. With the right plan, materials, and safety precautions, DIYing your own wooden seesaw swing is easy. Make the most of your tools and wood to successfully build a seesaw swing for children or adults!
References